Home
Body Waxing
Body Piercing
Childrens Ear Piercing
Cluster Lashes
Ear Piercing
Eyebrow Tinting
Gel nail infills
Full Coverage Gel Nail Extentions
Gel Nail Removal
Hopi Ear Candle Treatment
Contact Us
Gel nail extensions have revolutionized the manicure landscape, offering a durable and stunning alternative to traditional nail polish. However, as with any beauty treatment, proper removal is paramount to maintaining the health and integrity of your natural nails. In this article, we will explore the step-by-step process of safe gel nail extension removal, common pitfalls to avoid, and tips for nail care post-removal.
Improper removal of gel nail extensions can lead to a range of issues, including:
To prevent these problems, it’s essential to follow the right removal procedure.
Gather all materials and find a well-lit, comfortable space to work. If you have multiple fingers to do, consider setting up your supplies in an organized manner to streamline the process.
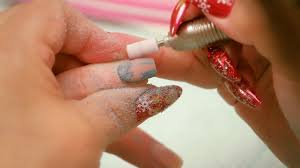
Using a coarse nail file, gently file the shiny top layer of the gel nails. This step helps the acetone penetrate the gel, making it easier to remove. Be careful not to file too aggressively, as you want to avoid damaging your natural nail beneath.
Moisten cotton balls or pads with acetone, ensuring they are saturated but not dripping. Place the soaked cotton on the nail surface. If you're removing extensions from multiple fingers at once, you can protect them with pieces of aluminum foil wrapped tightly around each finger.
Allow the acetone to work its magic for approximately 10-15 minutes. You can use this time to relax, catch up on a show, or enjoy a cup of tea.
After the designated time, check a finger to see if the gel has lifted and softened. Use a cuticle pusher to gently scrape away any lifted gel. If the gel isn’t coming off easily, reapply the acetone-soaked cotton and wait a few minutes longer.
Once the gel is removed, wash your hands with soap and water to eliminate any remaining acetone. Dry your hands thoroughly.
Post-removal, your natural nails may be dry and sensitive. Apply a generous amount of cuticle oil and hand moisturizer to restore hydration. Optionally, you can buff your nails lightly for a smooth finish, but skip this step if your nails are particularly damaged.
Nail care is essential in the days and weeks following gel extension removal:
Removing gel nail extensions doesn’t have to be a daunting process. By following the steps outlined above and prioritizing nail health, you can enjoy beautiful, healthy nails without the damage. Whether you’re opting for a bare look or planning your next manicure, taking care of your nails will ensure they remain strong and vibrant for years to come.
If your interested in using my gel nail removal service please call me on 07903517415.